
How to Build a Garden Sauna Base: A UK Installer's Guide

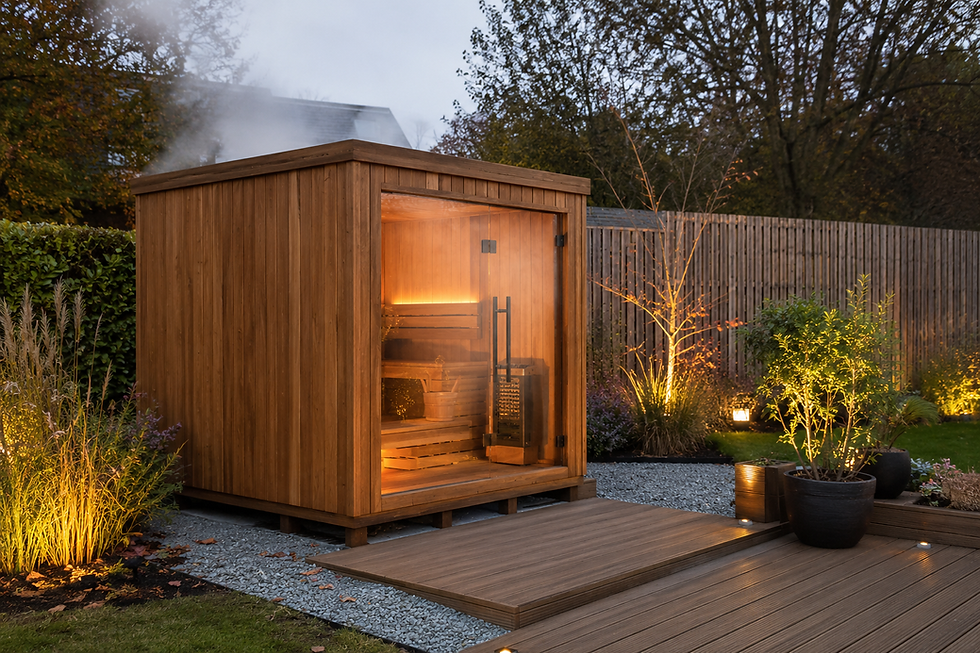
A garden sauna is one of the fastest-growing things people are adding to UK gardens right now, and most of the questions we get are about the cabin itself: barrel or cube, electric or wood-fired, which timber. But the part that actually decides whether your sauna lasts is the bit nobody photographs. Getting the garden sauna base right is what keeps the cabin level, dry and standing straight in ten years, and it is where the installer's-eye view matters far more than the brochure.
The good news is that a sauna is not the monster load a hot tub is. A two-person barrel sauna is often only around 250 to 400kg dry, and even a larger cabin is a fraction of a filled hot tub. The number worth remembering, though, is not the dry weight — it is the in-use load once you add two or three occupants, the heater, a full set of stones and the water that goes with them. That is why suppliers often ask the base to carry well over 400kg even for a modest cabin. So this is not really a story about brute strength. It is a story about airflow and moisture, because a sauna sits on the ground, gets hot, and sheds water, and those three things are exactly what rot timber and warp a badly built base.
Here is how we approach it, whether the sauna is going on the ground, on a slab, or built into a deck.
Why a Garden Sauna Base Is About Airflow, Not Just Weight
Because the weight is modest, the temptation is to plonk the sauna straight onto grass, gravel or an old patio and be done. The problem is that a sauna cabin traps moisture underneath itself. Warm timber above cold, damp ground pulls condensation, rain runs off the roof and pools around the feet, and if that air cannot move, the underside of the cabin never dries out. That is how even a well-built cabin quietly rots from the floor up while the outside still looks perfect.
So the first rule is simple: the base has to lift the cabin clear of the ground and let air circulate underneath it. We like to see the sauna held 50 to 100mm clear on bearers, feet or a slatted frame, with nothing sealing that gap — that clear, unsealed air path is worth more to the lifespan of the cabin than any amount of extra concrete. If you are also thinking about a hot tub alongside it, that is a genuinely different load calculation, and we cover it fully in our guide to putting a hot tub on composite decking.
Ground-Level Bases: Slab, Pads or Ground Screws
For a sauna sitting at ground level, you have three sensible routes.
Concrete slab
A full concrete slab is the traditional option and works well provided it is laid to falls so water runs away from the cabin, not into it. It is overkill for the weight, but it gives you a flat, permanent, well-drained surface.
Concrete pads
Concrete pads or paving slabs under the bearer points are a lighter, cheaper alternative that suits most barrel and small cabin saunas. You are only supporting a handful of load points, so a series of level, well-bedded pads does the job — but they have to bear on firm, compacted, free-draining sub-base, not on soft topsoil, with open gravel between them for drainage and airflow.
This is where UK ground catches people out. Our soil moves with the seasons: it freezes and lifts in winter — frost heave — and clay in particular shrinks in a dry summer and swells again when it is wet, more so anywhere near trees. A pad bedded lazily on topsoil will lift, drop and rack the cabin out of square within a couple of winters. Get it down onto firm bearing below the soft stuff and it stays put.
Ground screws
Ground screws are the third route and our favourite on soft, sloping or awkward ground: they drive down past that unstable surface layer to firm bearing, lift the frame clear of the soil, and leave the ground open underneath so everything breathes. That is exactly why we reach for them where frost and clay movement are a risk — they sidestep the whole problem. Whichever you choose, the base must be level and it must drain.
One more thing to plan in at this stage: an electric sauna needs its own properly certified electrical supply, and any electrical work must be signed off by a qualified electrician. It is far easier to run that circuit while the base and frame are open than to retrofit it afterwards, so we coordinate the two together.

Putting a Sauna on a Deck: Ventilation Under the Cabin
Plenty of clients want the sauna to sit on the deck as part of one continuous outdoor space, and that is absolutely doable, but the frame underneath has to be designed for it from the start. This is where a proper subframe earns its keep. A deck built to carry and ventilate a sauna needs correctly specified, correctly spaced joists under the cabin's load points, generous airflow paths so the space beneath both the boards and the cabin can breathe, and a slight fall so water is always leaving.
Just as important is what happens where the cabin meets the deck: we never butt the cladding down tight against the boards, but leave a gap at the foot of the cabin so splash and steam drain and escape rather than wicking up into the bottom of the timber. We go into how a frame is specified and why it matters in our guide to what is under your decking.
The mistake we are called out to fix is a sauna dropped onto a deck that was only ever built for foot traffic and a table. The joists are too far apart, the airflow is choked, and within a couple of winters the boards under the cabin are damp and tired. Get the frame right and a deck is a superb sauna base, because a well-ventilated deck is doing exactly the job a sauna needs. It is the same airflow principle that makes ventilation under any deck so important.
Moisture, Drainage and Rot: The Real Enemy
Everything about a sauna base comes back to keeping water moving away. Design the base so roof runoff and splash drain off and away, never towards the cabin feet or into a low spot that holds a puddle. Keep bare timber off wet ground entirely, using screws, pads or a frame so nothing structural is sitting in soil. And choose the surface around the sauna to cope with constant damp: a quality capped composite board around and up to the cabin shrugs off the splash and steam that would grey and rot softwood decking, which is why we tend to run Millboard or a similar capped board right up to a wellness setup rather than cheap timber. Good drainage is not a detail here, it is the whole game.
Shelter and Year-Round Use
A sauna earns its keep in January, not July, which is exactly when a British garden is least inviting to dash across. This is where shelter turns a nice cabin into a space you actually use all year. A pergola or, better still, a louvred veranda roof over the approach, the changing area, or an adjacent cold plunge or hot tub means you can move between hot and cold without standing in the rain, and it ties the whole thing together as one wellness space rather than a shed in the corner. We install Deponti pergolas and verandas for exactly this, and you can see how the roofed options work on our pergolas and verandas page. It is worth planning the shelter and the base together, because retrofitting posts and footings into a finished deck is far harder than allowing for them at the start.
Getting Your Garden Sauna Base Right
A garden sauna base is not about pouring the most concrete. It is about lifting the cabin clear of the ground, letting air move underneath it, and making sure every drop of water has somewhere to go. Do that, whether on pads, screws or a properly built deck, and the cabin above will outlast the trend that made you want it.
If you are planning a sauna, or a whole wellness corner with a plunge, a tub and a bit of shelter over the top, get in touch. We will design the base and the frame around what is actually going on it, so it is right from the first cut rather than a fix a few winters later.


Comments